For any QuickBooks to Salesforce integration, one of the most important configuration steps is tax mapping. If taxes are not configured correctly, transactions such as invoices or sales receipts may fail to sync.
For non-US QuickBooks companies, taxes are typically applied at the transaction line item level rather than the overall transaction level. This means each line item must include the correct QuickBooks Tax Code ID.
In this guide, we explain how to configure Salesforce to QuickBooks tax mapping using QB Sync Made Easy, including how to pass the correct QuickBooks TaxCodeRef value when creating transactions.
Key Requirements for Salesforce QuickBooks Tax Sync
When using Salesforce to QuickBooks integration, the following tax synchronization rules must be followed:
- You must send the QuickBooks Tax Code ID, not the tax name.
- The Salesforce field must be mapped to TaxCodeRef.value.
- The mapping must be configured at the transaction line item level (such as Opportunity Line Item).
If the correct Tax Code ID is not passed, QuickBooks will reject the transaction.
How to Configure Salesforce to QuickBooks Tax Mapping
For Non-US QuickBooks companies, taxes must be applied to each transaction line item.
There are two supported configuration methods when using QB Sync Made Easy.
Method 1: Tax Mapping Using a Lookup Relationship
This is the most scalable and flexible approach, especially if your organization manages multiple tax codes.
Step 1: Create a Custom Tax Object
Create a custom object in Salesforce, for example:
Tax__c
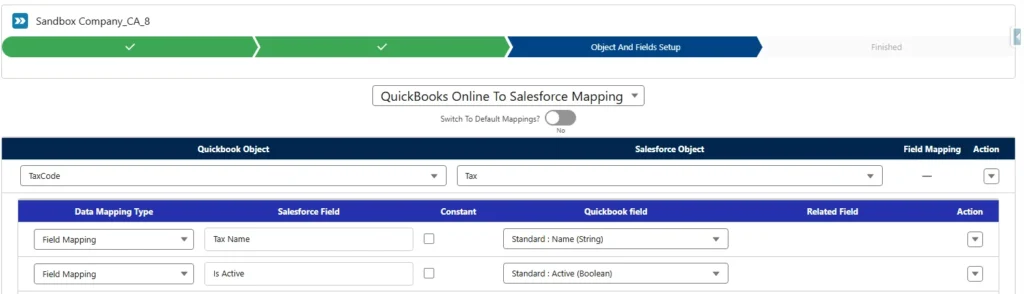
This object should be mapped with the QuickBooks TaxCode object in QB Sync Made Easy.
After syncing, this object will store:
- QuickBooks Tax Code Name
- QuickBooks Tax Code ID
This allows Salesforce users to select tax codes that already exist in QuickBooks.
Step 2: Create a Lookup Field in Opportunity Line Item
Create a Lookup Relationship field in Opportunity Line Item.
Example field:
QB Tax
Configure the lookup to point to the custom object Tax__c.
Add this field to the Opportunity Line Item page layout so users can select the appropriate tax for each line item.
Step 3: Configure Line Item Mapping in QB Sync Made Easy
In QB Sync Made Easy:
- Go to Line Item Mapping
- Select the lookup field (e.g., QB TaxCode)
- Map it to:
TaxCodeRef.value

This ensures the QuickBooks Tax Code ID is sent correctly when creating the transaction in QuickBooks.
Method 2: Tax Mapping Using a Picklist Field
If you prefer a simpler configuration without lookup relationships, you can use a picklist field.
Step 1: Create a Picklist Field
Create a Picklist field on Opportunity Line Item.
Example values:
- GST 5%
- VAT 10%
- Sales Tax
Step 2: Create a Formula Field
QuickBooks requires the Tax Code ID, not the tax name.
Create a Formula Field that converts the selected picklist value into the corresponding QuickBooks Tax Code ID.
Example formula logic:
CASE(
Tax_Picklist__c,
“GST 5%”, “QB_TAXCODE_ID_1”,
“VAT 10%”, “QB_TAXCODE_ID_2”,
“Sales Tax”, “QB_TAXCODE_ID_3”,
NULL
)
This formula returns the correct QuickBooks Tax Code ID based on the selected tax.
Step 3: Map the Formula Field
In QB Sync Made Easy:
- Go to Line Item Mapping
- Select the Formula Field
- Map it to:
TaxCodeRef.value

This mapping ensures that the correct QuickBooks Tax Code ID is sent when creating the transaction in QuickBooks.
Note: When configuring Salesforce QuickBooks tax mapping, keep the following points in mind:
- Tax mapping must always be configured at the transaction line item level.
- The mapped value must be the QuickBooks Tax Code ID, not the tax name.
- Incorrect or missing Tax Code IDs will cause transaction sync failures.
- Ensure tax codes already exist in QuickBooks before configuring the mapping.
Conclusion
By following the steps in this guide, you can set up tax mapping correctly and ensure that tax information flows smoothly during Salesforce to QuickBooks integration. Once configured, your invoices and sales receipts can sync with the correct tax codes, helping you avoid common tax-related sync errors.
After completing your tax setup, you can explore other features to get even more value from your QuickBooks Online integration. If you’re planning to sync historical data or need help with configuration, check out our related guides or book a call for assistance.